
This is a reprint from an article I wrote for TechGenix
One of the IT constants is that Microsoft will always change the way that things are done. As IT professionals it falls to us to keep our settings and configurations up to date. Preventing the AutoForwarding of email off of your domain is a security staple. Recently the transport rule that powered this stopped working for two of my clients. The rest have continued to work but it’s probably just a matter of time before they stop working too. So, my techs are off making changes proactively right now.
As a refresher, the reason that we need to prevent AutoForwarding is because it is a favorite tool of criminals to send your email to themselves so that they can learn about the company and plan their spear phishing, man in the middle, or ransomware attack. This let’s them strike with specific knowledge about the company like where your most important files are located, who your customers are, who controls the money, etc. All very important information if you’re in the extortion business.
Threat Management Policy
The new method of blocking AutoForwarding is managed in Threat Management policies instead of Exchange transport rules. It is well hidden with a relatively new default policy called Outbound spam filter policy.

This policy blocks AutoForwarding of email by default. If you don’t need to make any exceptions, then you’re all set. There’s nothing more to do except to remove any existing transport rule that you may have created to block AutoForwarding because it isn’t needed any longer now that blocking is simply a default setting.
However, if you do have a need for email to be automatically forwarded from internal to an external destination, then a custom policy must be created to allow any exceptions. Most business won’t have many exceptions. It should be rare that anyone in business needs to forward all of their email automatically. However, we do see some cases where there are specific needs for automatic email forwarding. Generally, you’ll find this to be the case when email needs to go out to a cloud hosted SAAS app.
My testing has uncovered that you can’t allow autoforwarding from a mailbox because it is the system that forwards the mail, not the email address of the mailbox itself. You can see it here in the log snippet as that long ugly MicrosoftExchange address.

However, you can set an exemption to a group or a shared mailbox. These entities forward the mail as themselves. So that is the approach that we need to take. We can either create a group, if there is a large number of exceptions to make or use a shared mailbox for a single instance.
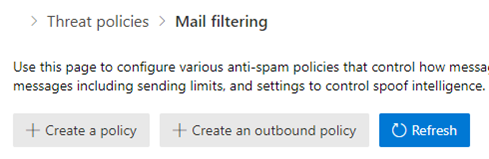
Create the custom Outbound Spam policy
Open the Security console and navigate to Policies. Then open the Anti-spam (Office 365) policy.

You will see four default policies. Notice that they are default On and cannot be turned off. Further no exceptions are allowed in the default Outbound spam filter policy so a custom one will be created. In the end the policy that we are creating will be at the top and take precedent over the default policy.
Press the create an outbound policy button
Give the policy a name of Autoforward exceptions or similar. Then expand the Notifications section and check both boxes.
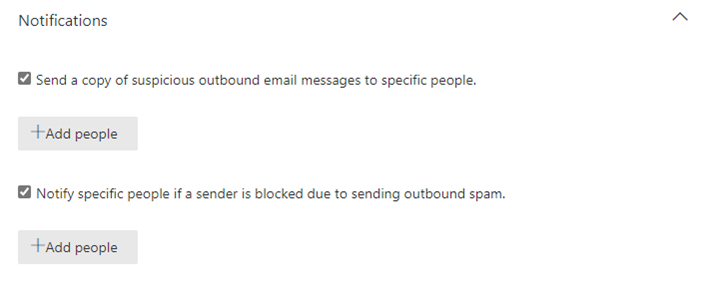
Press the Add people button. Enter the email address of the person that will get notified when an autoforward is attempted. Why send alerts? Any autoforward will be noteworthy either because it will be a spear phishing attempt from a compromised account or a frustrated person trying to enable a legitimate use of the auto-forwarding feature. In both cases the admin will needed to assist in resolving the situation.
Expand the Automatic forwarding section then set the choice to Forwarding is enabled. It’s a bit counter intuitive at first to make this choice but our next step is to refine that choice limiting it only to the group or shared mailbox that requires the autoforward feature.
Now expand the Applied to section
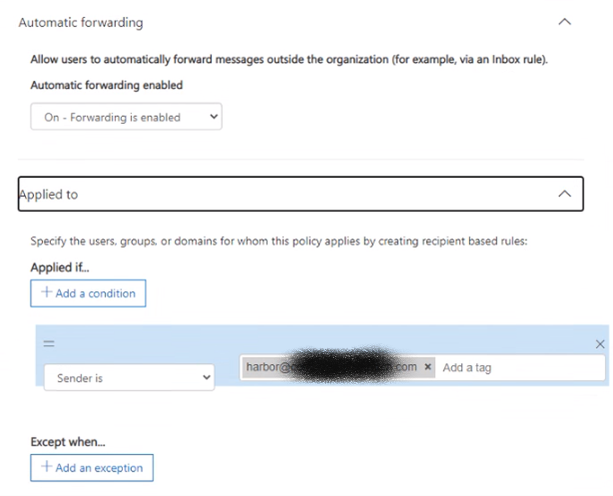
In the Applied if…option choose Sender is and enter the email address that you want to exempt. Be sure to hit enter to get it to save into the field.
Finally, save the policy. I would recommend re-opening the policy to make sure that your setting stuck because as I was working through this, I noticed that occasionally they did not, and I had to enter them a second time. Probably I was making too many changes for the portal to keep up with. But it’s best to check.

Now that our policy exists, we need to move into the testing phase to make sure that it is working as expected. But before we do that, we need to disable any pre-existing transport rules that were blocking autoforward.
Disable the now unused Exchange transport rule
Open the Exchange Admin center
Navigate to Mail Flow, then Rules
Disable any existing Block External AutoForwarding rule by unchecking it
After testing is complete, in the next maintenance cycle return and delete the now unused transport rule for final clean up. Why wait? Because good IT admins always want to be able to get from where they came should something go wrong.
Test the Policy
This policy should block external auto-forwarding for any user that doesn’t have an exception listed and also that it allows the one that is in the exception list.
Test 1: Create a new shared mailbox. In the mail features settings, choose to forward all email to an external email address. Now send an email to that shared mailbox address and see if it is received to the external address. If it is blocked, then the rule is working correctly.
Test 2: Send an email to the addresses of any exceptions created in the policy we just created. If the email is received by the forwarding address, then the rule is working correctly.
How to Verify blocked email
Open the Exchange Admin Center. Navigate to Mail Flow then Message trace. Here I’m using the “new exchange admin center”. You may need to flip to the new experience.
In Default queries, choose All failed messages for the last 7 days
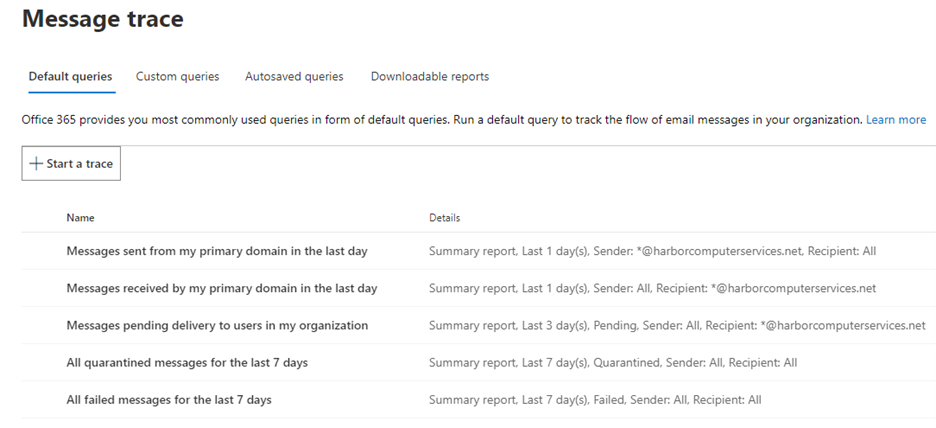
Narrow the time frame from 7 days to just hours so you can easily see the results of the tests you ran. All other settings can remain at the default. Press the search button. A report will be generated that will show the failed message delivery.
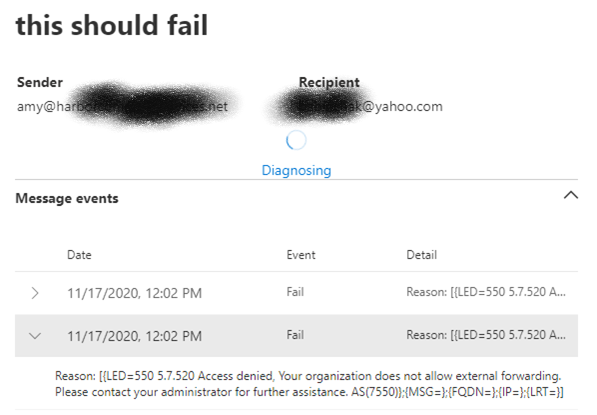
In addition, an NDR should be returned to the sender.

The second test is to check for successful email delivery. You know how to do that one. The email arrives. If you don’t have access to the delivery location you can use the default query, Messages sent from my primary domain in the last day to view the successful delivery notices.
That completes our migration from transport rules to threat management policies. I know change can be annoying, but change is what keeps us IT pros employed. Enjoy the process.
All we do is support IT professionals. Help for IT Pros, Super Secret News, Security community, MSP Legislation community, Kits, papers, MSP training and more. https://www.thirdtier.net


2 thoughts on “New method for blocking autoforward and making exceptions”
Steps are outdated but then again, MS keeps changing websites etc. You say to Add the user (via a group or shared mailbox) you want to allow forwarding for. In the modern console there’s an Include and Exclude, and option for User, Group, or Domain on each. I assumed I’d need to put my user in Include, and maybe? our domain in Exclude to block everyone else? (surely we shouldn’t have to exclude the other several thousands of users one by one) And the new policy doesn’t appear completely on top of all others, but it DOES appear above Anti-Spam Outbound policy so I thought that’d be good enough. But tested and not working – allows other users to setup rules in their outlook to forward to their personal Gmail account for example… so some step is missing..
Keeping up with changes in the UI is a continual challenge. I’ll see about making another update to this post.