
There’s long been a dream of eliminating passwords and so we added MFA to those passwords and then we added YUBI keys and facial recognition and fingerprints and better more accurate finger and face recognition and texts and oh my it’s gotten ugly out there. No one loves this current reality more than they loved their password. We answered this challenge by adding Trust IP’s to MFA, so if we’re in the office (which we aren’t in 2020) then MFA wouldn’t prompt but that pesky password issue was still there.
As we took each of these steps though, it was promised to be a step toward that glorious day when passwords would be behind us. Instead, our authentication would remain valid until something about our activity changed or was suspicious. Well, we’re getting closer and closer to that day. Now is the time to take a big step forward in that direction.
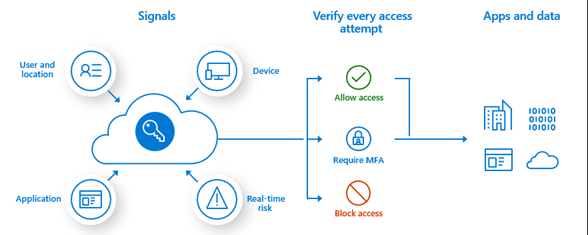
Microsoft describes it this way. Azure AD conditional access evaluates signals from User and location, Device, Application and Real-time risk to determine what type of verification is required to access to apps and data.
Ref: What is Conditional Access in Azure Active Directory? | Microsoft Docs

In the Access controls section, we’re going to use a Session control and set it for 90 days.
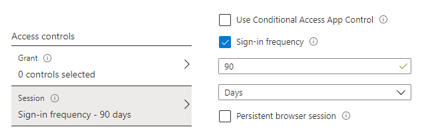
Press Select and then Save to create this policy.
Conditional Access: Persistent Browser Control
Create another new conditional access policy. This one we’ll call Persistent browser control. We’ll assign this one to our all-users group and All cloud apps as we did for the previous policy.
This time in the Access controls section, we’re going to use the Session control Persistent browser session.
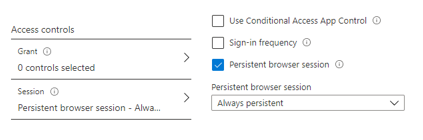
Recall from above that this is going to apply to mobile devices and app accessed in the browser.
Other Settings adjustments
Microsoft sometimes doesn’t know where to put something or maybe it once made sense in simpler times but we have a setting found in Company Branding to modify. Scroll all the way down to the bottom of your company branding policy and make sure that the Show option to remain signed in setting is set to Yes.

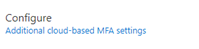
We also need to make an adjustment to MFA. Usually, you don’t go in here unless you’re configuring an in-premises MFA solution but there’s something in here for cloud MFA that we need. Here we’re going to open MFA under Azure AD/Security and notice the link for Additional cloud-based MFA settings under the heading Configure.
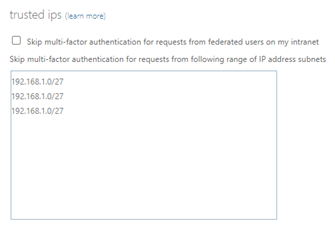
Here we need to remove a couple of legacy settings that you might be using. First we can remove any trusted ips, which is actually trust ip’s.
Next if you are going to use this for everyone, then recall that they’ll need the Microsoft Authenticator app for this all to work, so you could remove the options for call to phone and text message as verification options. If you won’t have all groups on this new method then you may need to keep those.
Finally, we need to uncheck the box under remember multi-factor authentication on trusted device box.

You can see Microsoft even has a note present here that is encouraging you to use the Conditional Access method that we just configured instead of this setting. Save your policy after making these changes.
Risk-based conditional access
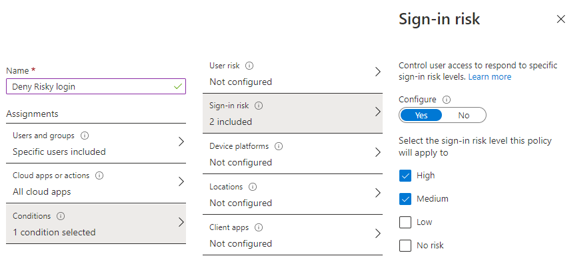
To enhance our conditional access, we’re going to add a risk-based policy that says, if the users risk level is medium or high then deny access. Start by creating a new conditional access policy and call it Deny risky login.
As we did above, we’ll configure it to apply to all of our users and all cloud app. This time we will also configure a condition and select the Sign-in Risk condition. In Sing-in Risk we select to configure and then choose High and Medium.
In the Access controls section, we’re going to simply use Block.
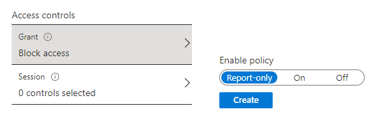
As this policy is a risk for getting yourself locked out of your tenant, Microsoft will default this policy to Report-only. Leave it there to test and select On when you’re ready to go live.
Here’s where we are now. We have configured conditional access policies and MFA to not prompt for reauthentication for 90 days unless the user’s status changes to Medium or High risk, or the user location, device or application falls out of compliance with our other settings. We’ve set the necessary controls so that both our mobile and static users can enjoy the benefit of less frequent login prompts.
I will add this. Please don’t use this in isolation from other security controls. You need to have at least a basic set of policies and profiles setup in Endpoint Security, you should have more conditional access policies, you should have Cloud App Security configured to send alerts and manage data access, you should be working toward implementation of adopting data loss prevention classifications and protections.
Security is a big job and it’s not someone else job. It’s everyone’s job. The security portion won’t get any less complex, but we don’t necessarily have to take that out on our users. The goal of IT should be to make things as secure as possible while maintaining ease of work. Walking that line gets more difficult by the day but the configuration we made here should help
All we do is support IT professionals. Help for IT Pros, Super Secret News, Security community, MSP Legislation community, Kits, papers, MSP training and more. https://www.thirdtier.net


